PA RENTAL INSTRUCTIONS
Please read this before using the sound system on the day of your event.
Please read this before using the sound system on the day of your event.
|
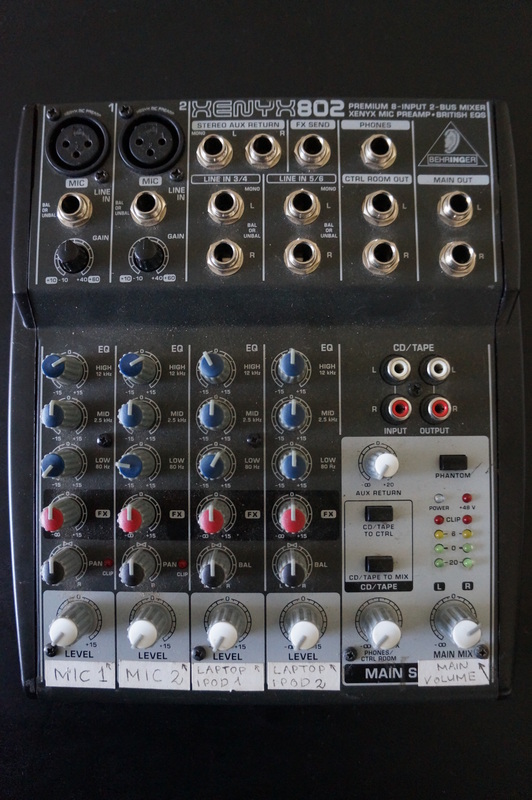
All levels, controls and frequencies on the speakers and the sound board are pre-adjusted. The only control you need to use is the third one from the right marked as “laptop/ipod 1”, which allows you to increase or reduce the volume of the music. Please make sure it’s all the way down before connecting/disconnecting your phone or laptop to/from the PA. Once your playback device is connected, you may slowly increase the volume to your desired level. The volume of the microphone is also pre-adjusted. The microphone has an on/off switch. Please turn it on before speaking and make sure to turn it off when you are done speaking. As long as you follow these simple instructions and do not move or touch the equipment (except the volume control on channel “laptop/ipod 1”), there won’t be any problems. For your safety, the safety of your guests and the safety of equipment, please do not attempt to change the way everything is connected. One small mistake can lead to serious injury or damage to the equipment. |
“What should I do if I can’t hear the music?”
1. Make sure the volume on your laptop or phone is up and the music is actually playing.
2. Make sure the audio cord connected to your phone and is all the way in. Try another phone.
3. Make sure the volume control on channel “laptop/ipod 1” is up at 9 o’clock (25%).
4. Make sure the main volume control on the sound board is up at 9 o’clock (25%).
5. Make sure the volume control on the speakers is up at 9 o’clock (25%).
6. Make sure the speakers are on by checking the green light in the back of each speaker.
7. Make sure the sound board is on by checking the blue light on top of the sound board.
8. Check XLR, RCA, ¼ inch and other connections. Sometimes connections may get loose.
“What should I do if I can’t hear the microphone?”
1. Make sure the microphone is on by checking the on/off switch on the microphone.
2. Make sure the volume control on channel “mic 1” is up at 9 o’clock (25%).
3. Follow step 4, step 5, step 6, step 7 and step 8 listed above.
“What should I do if I hear feedback from the microphone?”
1. Reduce the microphone volume on channel “mic 1”. This always helps.
2. Do not hold the mic too close to the front side of the speakers. This always causes feedback.
